Showing posts with label cake topper. Show all posts

Tuesday, June 24, 2014

Celebrating my goddaughter's 9th birthday!

My dear goddaughter turned 9 last Saturday. She had a blast at Chuck e Cheese's. 

I made the "9" for the top of the cupcakes tower. 

She wanted bright colors and Summer elements so I included waves and an umbrella among other things. 


Here's the back side of the project. 


I also stamped some flowers, sandals, fruits, and other images for each cupcake to have one top. 


Take a look at them here:


And see the beautiful girl enjoying it all. 


Tks for your visit and your comments. 


Sunday, May 18, 2014

Unity Be Inspired Challenge

Hello my friends.

My dear husband will turn 4+3 soon and we will go out to celebrate with friends.

It is something simple and it has to be low budget, so guess what?  Creativity on!
The celebration will be held in a wine related place (of course!!!) so I wanted to make a cake topper with that theme.

I made this using Unity's Be Inspired challenge inspiration.  Not only the color challenge, but the card sketch, helped me with this.


I used several stamps from Unity.  The little bottles in the green cardstock, the numbers 4 and 3, the bottle and the wine glass...  This last one particularly was part of a stamp with a background but I cut it to use only the glass.   I poured (painted) some wine in the glass and added glossy accents.  Also painted and stained a little bit the white circle to add some unity to the whole piece.
For the banner, using the same stamped numbers as stencils, made some extra flags and used the same wood sticks to hang them.

In this next picture you can see I added sticks so I can place in the cake, and also to provide stability to the whole creation.


Here's the inspiration challenge information.  Click in the image... Still can participate yourself!


 Tks for stopping by and for your comments.


Sunday, June 23, 2013

Happy 8th Birthday... Photos of cupcakes top in action!


Hello WC&S friends and followers...  I'm so happy with all your comments about the cupcake top I made for my goddaughter as per my last post HERE.  Thank you all!  The party was yesterday.  She had a blast! 

I promised to post pictures of the cupcake tower in action, so here they are.


Aren't these cupcakes beautiful?  They are from Walmart... Yes, they are... I'm not kidding.  But the most important part is that they were delicious!


This is me with the birthday girl.  She doesn't usually wear makeup.  Remember the party was a spa day so the girls were allowed to use makeup, their nails painted, they even had a facial and a craft activity... and they had like a fashion show at the end where they all walked and modeled for us to enjoy.


My goddaughter loved the party and she said what she enjoyed most was the moment everybody sang the Happy Birthday song to her.


Tks for stopping by.


Friday, June 21, 2013

Happy 8th. Birthday!

Hello... Happy Friday, and it's the first day for Summer!!!

How's your week been?  Mine has been productive... and full of surprises.  In case you wanna know, here's a summary... Or you can skip this paragraph and go directly to next one.  Weekend started with a homework to do for my goddaughter (I will tell you in a little bit); I dedicated the whole Saturday (literally) just for that, then an accident caused my 1st floor at home to get full of water on Father's Day so we could not go anywhere (some furniture damage), then an unplanned cool get together with neighbors at night, lots of work at the office (people say that when the cat is not home, mice go party!  I think it should be the opposite... it's when more pressure you have not to be absent or miss anything... I mean my boss is out of office just in case you didn't understand my humor LOL), then had to do some medical checkups, also my dog has an ear infection, good surprise that I had lunch with my DH in the middle of the week, mom still waiting for her car to get fixed, and finally will do my nails today...  Exciting, huh?  This is what life is all about...

Today's my goddaughter 8th. birthday.  There will be a little party tomorrow... just a get together with some friends to have a nice spa.  This kind of birthday celebrations for girls is kind of the "in" thing right now.  Her mother wanted me to make a top for the cupcakes tower, and also a tag or embellishment for the bags.

The cupcakes top had to have an "8" and some room to place a single cupcake where she plans to place the candle.

So I bought a foam 8 and used as stencil for its own covers...


Made sure to ink a bit to cover imperfections...


Covered one side with stamped cardstock...


And then realized I didn't like the interior of the holes, or basically the way you can see the back of each others' edges from the opposite side, so I had an idea...


I covered one of the sides to make it flat like this:


But then left the other one open to use as the front side and create some dimension.


Inspired by the birthday theme I'd cut some flowers, to which I draw lines to look like imperfect sewing and simulate the original ones.

I also stamped bees and several butterflies.


... So I used two of these for the interior of the 8's holes...  nice 3D effect!


I placed the 8 in the base, also made with foam covered with cardstock, and embellished all around... making sure to create a spot for the single cupcake.

This is the front side:


This is the back:

One of the sides...


And the other one...


I assembled the tower to visualize the final work.  I promise I will take pictures of it with the cupcakes tomorrow and will post later so you can see it in action.


Then... it was the bags' turn.  Wanted to make a tag with the birthday girl name and the number 8, but did not want a traditional tag.

So I typed her name and cut with scalloped circle punches, and placed an 8 in the middle.  I also used flowers, bees and butterflies...


Here's how they look...  They will have presents for the girl friends assembled with tissue paper.


And finally... a bonus.

My friend had given me some pieces of large confetti to get inspired. I combined those and some of my stamped images and glued to sticks to be placed in the cupcakes.
Can't wait to see them in use.  By the way, don't you just love this bee from Unity Stamp Co.?


I'm not finished...

I made her a card for tomorrow... Of course I used the same theme.

Stamped butterfly and bee...  cut flowers with drawing and painting for nice finish...  and I made up another beetle with some circles and sequins...


This is the inside of the card:


And here's a closer look to the nice colorful elements.


Stamps used are from Unity Stamp Co, TAC, Inkadinkado and Latina Crafter.

Tks for stopping by.  Love to read your comments.

Have a great weekend.


Friday, September 9, 2011

Carrousel

A carrousel! Yes, a carrousel.... Like life itself is a carrousel, don't you think?

I mean... if you are "in" the carrousel, you are "traveling" around seeing things... You see people waiving their hands and shouting your name... smiling, waiting for you to pass again... You go in circles and even though you go through same places, you notice different things and enjoy them differently... And if you are watching the carrousel from outside... you see the colors, you wish you'd be there, you notice different details in every ride and every time the animals, shapes or people go again and again... I think it seems like "life"...

But anyway... I made a carrousel... yes, a carrousel as a cake topper for a baby shower. And it was quite a project that I really enjoyed doing, but I made it up... well, as the scrapbookers love to do... make things up... create ... come up with something out of nothing .... don't you love it too? hehehehe

I started cutting circles...

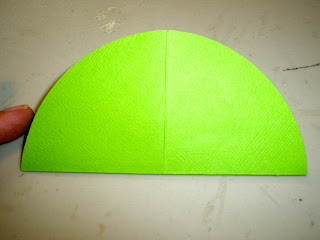
Bent the circles several times...
Bend, open it up, turn 90 degrees and bend again... then 45 degrees, then 90 again... so you bend 4 times and end up with this:

A circle with 8 slices marked/scored... I did the same with several colors so I can cut some of them from each color to use for my canopy or carrousel top... you'll see.

I scored the very end of the triangle (the end with the curve, from corner to corner), so I can use it as the little flap where I glued a half circle.

It should look like this:

And I made some of them in different colors...


Then I chose another circle and bent the same way as before, but this time I just cut one of the lines scored, until the center of the circle.
Then I glued the two "triangle" I just separated with the cut... and came up with this:


I glued the already assembled pieces in each of the triangles...
Make sure you glued in a way the folded line is positioned down enough so it can be bent and the semi circle or half circle can hang from the roof...

Here's a view from the back/interior....
I also added strips to create a hole in which I was going to be holding the sticks later. I preferred it in addition to the glue dot I was going to use, but I am sure you can just glue them if you prefer...


Then, for the base, I used foam. Cut 2 different sized circles and a smaller one thicker on top. I cut the largest circle 5.5" because the cake will be 6".

I covered them up with cardstock and embellished with borders and shapes as desired...

In the top cardstock I made the holes needed for the canopy before I glued it to the foam.
I created separation between each foam with more foam in the center...


Then to position the canopy or roof, I placed colored dowel rods ("tarugos" in Spanish). I bought them in the crafts section in a local convenience store. I first positioned them in the "hole" I created with the strips (also aded a tiny glue dot to the end for more support).

Then I positioned them in the premade holes in the top foam... to see how they will look...

After being convinced they were going to be ok, I then cut a cylinder from paper towel to the right size, and covered with patterned paper/cardstock and placed in the center before putting back the canopy and gluing the "holes" a little bit. I pushed the rods as necessary to make the canopy look aligned (without being higher from one side vs other).
Then I glued some precut animals in the rods for the great final look...
I also used a toothpick and a piece of cardstock to write the name of the baby in a flag and placed in top of the canopy, also adding a little circle as base.


Here are some pictures with the details...

Top view...
Close ups...


And the... this is how it finally looked placed in the cake... Unfortunately, the baker (a coworker with such a great talent), had to get rid of the base, because the cake didn't come out with exactly 6"... so she only placed the one floor carrousel...


It looked nice though... don't you think? And the cake was beautiful. She embellished with circles and stripes and also used a little bit of the same cardstock I used in the cake topper, to make all look in unity.


I hope you liked my cake topper and get some inspiration with it...

Thanks for your comments... I'm so excited to read them all... :)